BACK TO
GETTING STARTEDAdvanced Tracking
Home Screen
-
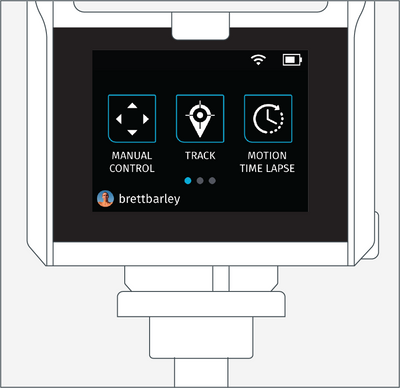
Home Screen: Page 1
Manual Control App: Record or live stream without enabling automatic tracking.
Track App: Start/stop tracking, toggle record on/off, trigger single photos or bursts, adjust tracking and camera settings, quickly manage your Tag(s), and live stream.
Motion Time Lapse App: Capture a series of photos at preselected intervals. -

Home Screen: Page 2
Tag Manager: Select Tags that you would like to track from the Tag Manager.
Settings: Manage Wi-Fi, format the SD card, access current software version and more.
Update: Install the most recent software updates on the Base, Tag and/or Camera. When updates are available, the user will be notified upon entering the Update App. -

Home Screen: Page 3
Gallery: Playback your video and photos on the touchscreen. [Coming Soon]


Tracking Settings
-
Open from the Viewfinder
Many tracking settings are available to suit your filming preferences. Tracking settings can be adjusted prior to calibration or any time during tracking/filming.
Open Track Settings by tapping the TRACK button. -

Open Settings
Select SETTINGS
Default Settings:
Camera Mode: Video
Resolution: 1080p60 fps
Framing: Bottom Middle
Field-of-View: Medium
Trajectory: 3 Seconds -
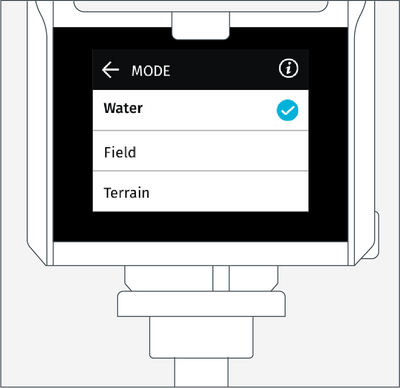
Track Modes
Water
For performing activities on the water.
Examples: Surfing, Kiteboarding, Sailing.
Field
For performing activities on a level playing field or gradual slopes.
Examples: Soccer, Track and field, Equestrian.
Terrain
For performing activities on uneven surfaces.
Examples: Skating, Snowboarding, Motocross
Flight
For performing aerial activities.
Examples: RC planes, Drones (UAVs), Paragliding -

Field of View
The Field of View (FOV) determines how much of the shot is visible on Camera. The tighter the FOV, the camera will zoom in. The subject will appear larger in the frame relative to the visible background. The wider the FOV, the Camera will be zoomed out. The subject will appear smaller in the frame relative to the visible background.
Field-of-View Parameters:
Tight: 10 meters
Medium: 20 meters
Wide: 40 meters
Extra Wide: 80 meters -
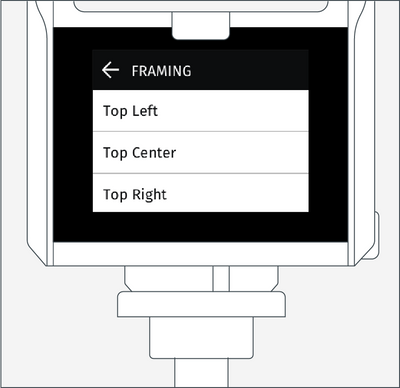
Framing
Framing determines where the subject will appear within the shot. Choosing a framing setting is entirely based on personal preference.
Framing Parameters:
Field: Bottom/Middle or Center
Water: Bottom/Middle or Center
Terrain: Center
Flight: Center -
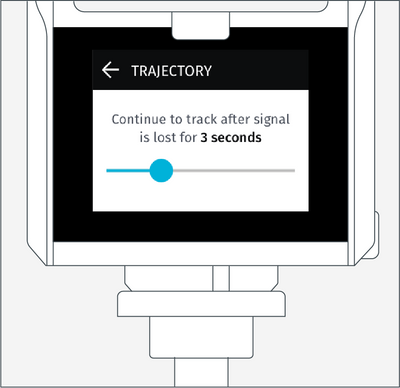
Trajectory
If the Base temporarily loses the Tag’s signal, the trajectory will determine how long the Base will continue to move in the same direction and speed at the time the signal was lost.
Range: 1-10 seconds.
The default is set to 3 seconds.
Example: Great for surfing when becoming completely covered up in a barrel. This mode keeps the Camera tracking on the last known trajectory to ensure that you’re still in frame when reemerging. The Camera will temporarily pause tracking if it's unable to reacquire the Tag’s signal within the specified trajectory time setting. In other words, if you plan on being inside a barrel for more than 3 seconds, then set trajectory to 4 seconds or more. Once the Camera reacquires the Tag’s signal, it will automatically resume tracking.


Accessing Camera Settings
-

Accessing Camera Settings
Tap the PULLDOWN MENU. -
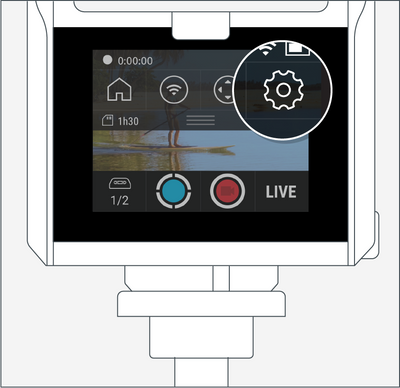
Settings Icon
Tap SETTINGS Icon. -
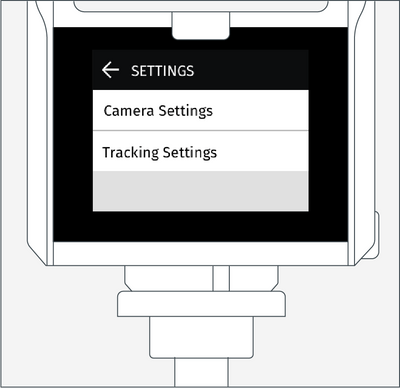
Camera Settings
Select CAMERA SETTINGS.
IMPORTANT: Tracking and recording stop when accessing Camera Settings.


Video Mode Settings
-

Changing the Resolution
Enter Camera Settings (See "Accessing Camera Settings").
Tap RESOLUTION to change the video resolution.
Default Settings
The Camera is set to Video Mode with a resolution of 1080p60. -
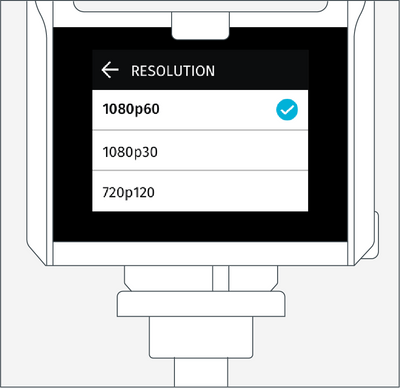
Resolution Parameters
Optic65 Camera
4k30
1080p30
1080p60
1080p120
Optic25 Camera
1080p30
1080p60
720p120 -
Select and Exit
Select desired resolution.
Tap the BACK ARROW to exit CAMERA SETTINGS.


Photo Mode Settings
-
Accessing Camera Mode
Enter Camera Settings (See "Accessing Camera Settings").
Tap Camera Mode -
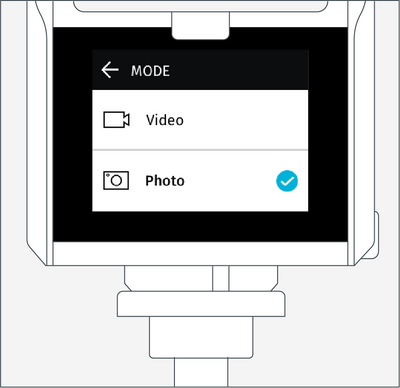
Selecting Photo Mode
Select Photo.
Tap the BACK ARROW to enter Photo Camera Settings. -

Photo Mode: Camera Settings
Here, you can adjust the following:
Photo Mode: Single or Burst
Timer: The delay time between when you tell the Camera to take a photo(s) to when the shutter fires. This can be set to 2, 5, 10, 30 or 60 seconds. -
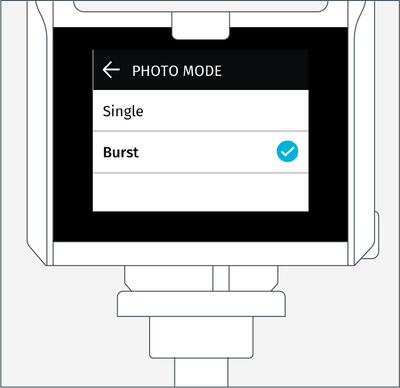
Photo Burst
Enter Photo Mode (See above).
Select Burst and tap the Back Arrow. -

Photo Burst: Settings
When Burst is selected, a new option is available.
Rate: This setting allows you to choose the number of consecutive photos to take over a period of time.
Rate can be set to the following:
30 photos/10s, 6s, 3s
20 photos/7s, 4s, 2s
10 photos/3s, 2s, 1s


Taking Photos
-
Requirements
• In Photo Mode
• Must be Calibrated and Tracking. -

From the Tag
Press the (+) Button on the Tag.
The Camera will take photos based on your selected settings. -

From the Base
Tap the SHUTTER/RECORD button.


Tracking Multiple Tags
-
Requirements
At least two (2) Tags and/or Bases must be turned on and Tracking. -

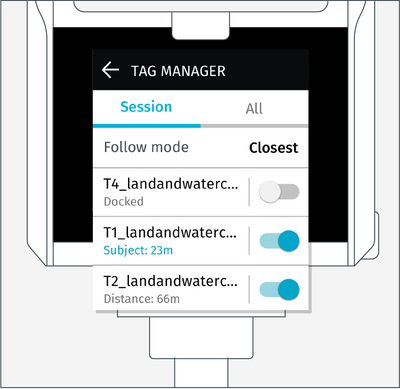
Enter Tag Manager
Enter the Tag Manager from either the Home Screen or the Track App (See Tag Manager).
Select which Tags you want to follow.
Tap Follow Mode. -
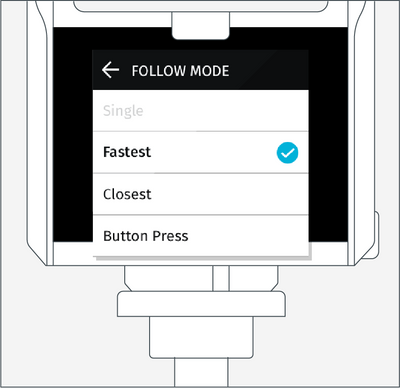
Select Mode
Select a Follow Mode and tap the Back Arrow to exit.
Settings Descriptions
Closest: The Base will track the closest Tag.
Fastest: The Base will track the fastest moving Tag.
Button Press: Tapping the button on the Tag will trigger the Base to begin tracking that Tag. The Base will continue to track this Tag until another Tag performs the button press.
Group Mode (NEW): Keeps all Tags that are paired with the Base in frame. Great for team sports.


Offloading and Viewing Content
-
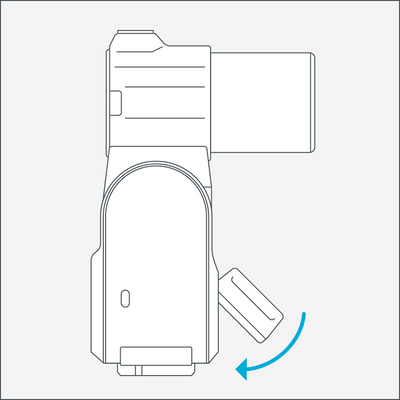
Ejecting the MicroSD Card
End the session by stopping recording and tracking before removing the MicroSD card.
Push the MicroSD card to eject it from the SD card port.
Carefully remove the MicroSD Card. DO NOT use sharp/metal tools to remove the card. This may damage the MicroSD Card port. -

SD Card Reader and Adapter
Insert the MicroSD card into a SD card reader.
If your computer does not have a built-in reader, an external reader will be needed.
A MicroSD Card Adapter, above, may be needed. This is usually included with the MicroSD Card. -

Moving DCIM Folder
Move the DCIM folder or selected files from within the folder onto your computer.
Your video files will end in .mp4


Tag Manager
Tag Manager
-
REQUIREMENTS
In order for a Tag to be detected by a Base, it must be:
• Powered on
• Have been docked to the Base in the past
• Be within the 2,000-ft. tracking distance
• Have a GPS signal -

Accessing From the Home Screen
The TAG MANAGER is accessible in the following ways.
• Home Screen (above)
• Track App Viewfinder (See next section) -
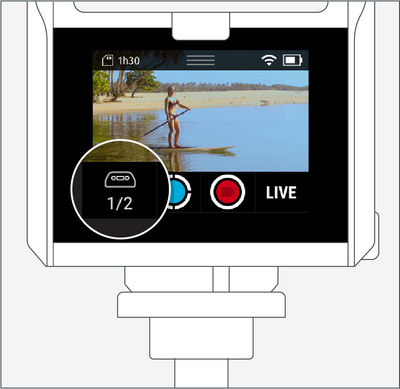
From the Track App
Tapping the Tag Icon will take you to the Tag Manager.
The Numbers
Below the Tag Icon are two numbers. The numerator (1st number) shows how many Tags are currently being tracked. The denominator (2nd number) shows how many Tags are paired, in range, and available to be tracked. -
Selecting Tags
Select the Tags you want to Track by toggling them on, or pair new Tags by docking them to the accessory port on the front of the Base. -
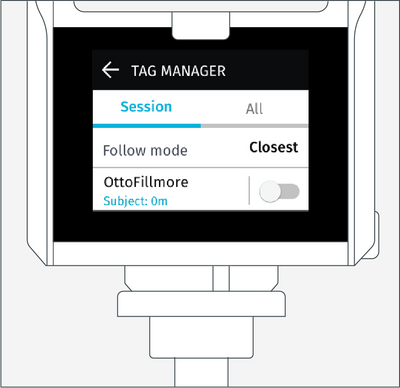
Tag Manager
Session
This list comprises of Tags that the Base is currently tracking, meets the pre-requisites to be tracked, or has been tracked in the current session.
The list starts out empty until a Tag meets the pre-requisites. Tags remain in the list until the Base has been turned off, but will remain in the ALL list. -
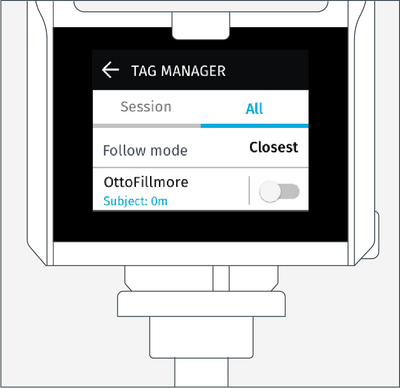
Tag Manager
All
This list shows a history of every Tag that has ever been docked onto the Base, even if they do not meet the pre-requisites.
This allows you to view and manage your history of Tag, including the ability to forget Tags.


Motion Time-Lapse App
Creating MTL Videos
-

Overview
Motion Time Lapse is the ability to capture a series of photos at while moving at predetermined intervals.
From the Home Screen, open the app. -

Open Settings
Motion Time Lapse is the ability to capture a series of photos while moving at predetermined intervals.
From the Viewfinder, tap the Dropdown Menu, then Settings. -

Modify Settings
Modify Interval and Number of Frames to create your desired result.
Elapsed Time will automatically calculate.
TIP: Use a shorter interval [2-3 seconds] when capturing faster moving objects. Use a longer interval [5 seconds or more] when capturing slower moving objects -
Settings Descriptions
Interval: The number of seconds that will elapse between each photo.
Interval Parameters: 3s, 5s, 10s, 30s, 60s
Number of Frames: The number of photos that will be taken in the session.
Number of Frames Parameters: 10, 100, 300, 450, 900, 1800
Elapsed Time: The total time it takes to perform the motion time lapse. It is calculated by multiplying the interval by number of frames, and is displayed in total minutes. -
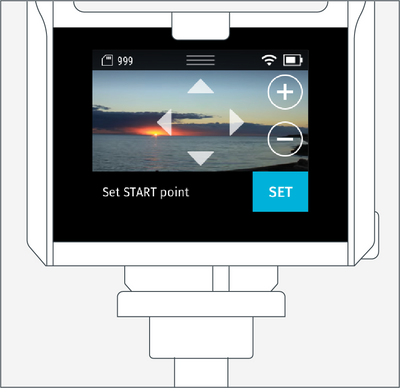
Set Start Point
Use the arrows to find a START point and adjust the field of view (degree of zoom).
Tap SET. -
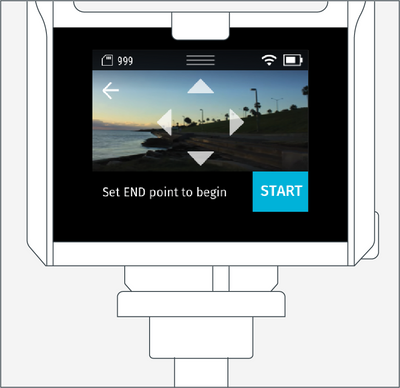
Set End Point
Use the arrows to select the END point (zoom is disabled at this stage).
When finished, tap START to begin.


Manual App
Using Manual Control
-

Home Screen
Within the HOME SCREEN, tap MANUAL CONTROL to enter the Manual Control App. -

Pan, Tilt and Zoom
Adjust the camera’s framing by tapping on the pan, tilt, and zoom (in/out) controls.
Tap anywhere else on the viewfinder to hide the controls and the status bar. -

Begin Recording
Tap the RECORD button to start recording. Tap the button again to stop recording. -

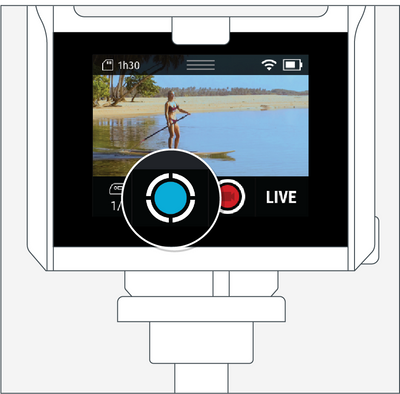
Start and Stop Live Streaming
Tap the LIVE button.
See Live Streaming Section.


Update App
Update Software
-
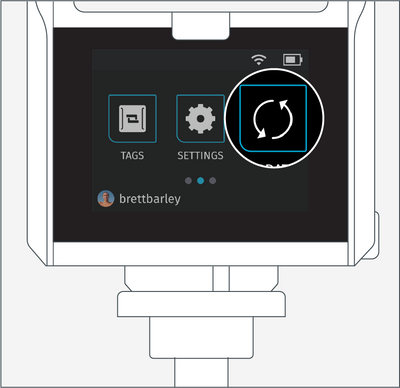
Check For Updates
In the home screen, select the UPDATE APP.
The system will automatically check for available update.
NOTE: SOLOSHOT3 and its components will continually improve over time with frequent software updates. Updates contain performance improvements, new features, and bug fixes just like software updates on your smartphone or computer. -
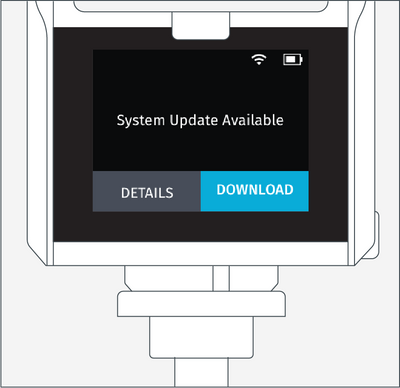
Updating
If an update is available, you can view the change log and/or begin the update by tapping “Update.” Follow the on-screen instructions to update the Base, Tag, and Camera.
If no updates are available, then tap DONE to return to the home screen. -
IMPORTANT
The Tag must be placed in Update mode before updating the software.
See Next Section, Tag Update Mode


Tag Update Mode
-

Power Off
Power off the Tag by holding down the Power button for 2 seconds, until the screen turns off. -
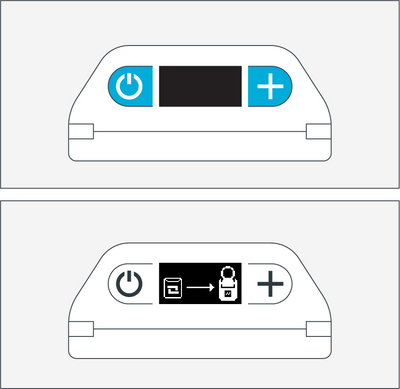
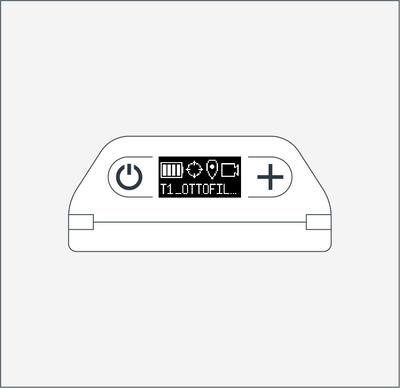
Power On In Update Mode
While holding down the (+) button, press the power button.
The Tag will turn on and the OLED will display a graphic indicating that it needs to be docked to the Base. -
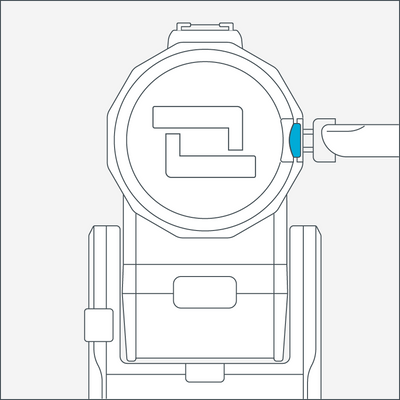
Dock the Tag
Dock the Tag into the accessory port on the front of the Base.
Follow the onscreen instructions and continue with the update process.


General Settings
Wi-Fi
-
Wi-Fi network is required to perform software updates and to live stream.
Supported Networks:
2.4 GHz
Non-supported Networks:
5 GHz, Captive portals
SD Card
-
Viewing and Formatting
View capacity and format your SD card. Remaining storage is calculated based on the currently selected recording resolution in the Track App.
Recommended: Format your SD card the first time, before use.
• Settings > SD Card > Format
Use only approved SD Cards available through authorized sellers. -
Approved Micro SD Cards
Sandisk or Lexar are preferable to us, however we can recommend the following cards:
Manufacturer | Model | Capacities(GB)
Sandisk | Extreme Pro | 16, 32, 64
Sandisk | Extreme Plus | 16, 32, 64, 128
Sandisk | Extreme | 16, 32, 64, 128
Lexar | 1000x | 32, 64, 128
Lexar | 633x | 32, 64, 128
Samsung | Pro | 32, 64, 128 -
IMPORTANT
If you choose to go with another card, it should be rated U3 (UHS-I Class 3) or faster. Please note that compatibility/stability with other cards is not guaranteed.
We do not recommend the Lexar 633 x 200 GB microSD card.
Please beware of Amazon microSD cards disguised as SOLOSHOT microSD Cards. We DO NOT sell microSD cards on Amazon and these are not sanctioned by the company.
Display
-
Adjust the screen brightness and sleep timer.
Battery
-
View the charging status and current battery level.
Date & Time
-
Set the date & time, and time zone.
Recommended: Set automatically
Account
-
Within the Account app, view the name and details associated with your Base(s). Creating an account is part of the process when using a new Base for the first time.
Go to app.soloshot.com to create an account. -
Base Name
Your first Base registered with your account will be listed as B1_username.
• If you register a second Base, it will be listed at B2_username, and so on.
• You can register an unlimited number of Bases to your account. -
Base Details
View detailed information about the Base.
About
-
View software, legal, and regulatory information.